Showing posts with label raspberry. Show all posts

Monday, 21 February 2011

Raspberry Oat Bars (Easy Things to do with Cake Mix #2)

As I mentioned in my previous post, I am currently baking my way through some of the excess baking supplies I purchased during the holidays, most notably several boxes of yellow cake mix. If the pecan cake bars of my previous post were easy, this next recipe is still easier, and quite tasty. It has a great fruit flavor, which makes it a perfect bar to make now that the weather is (supposed to be) getting warmer. It flurried by my house this morning, and I heard on the radio that there was 6" of snow on the ground in Bergen County. So maybe these bars can make you feel like Spring is coming (so long as you don't look out the window or go outside).


I originally modified this recipe from a posting I saw here, although I altered a decent amount of ingredients

You start with a box of yellow cake mix. Just plain old yellow, not the Butter Recipe yellow, which has artificial butter flavoring added to it. Trust me, we are putting almost 2 sticks of butter into the recipe, we don't need any artificial butter flavor on top of that.

Take that dry cake mix and add some quick cooking oats (1 minute oats, do not use slow cooking oats). Mix them around to combine them a bit.

Then, add melted butter, vanilla, and a little lemon zest.

Take half the crumbs, and pat them down into a sprayed 9"x13" pan. Pat it down firmly.

Next, take some seedless raspberry jam, and combine it with about 1 tbls of fresh lemon juice, stirring until smooth. Then, spread the jam on top of the base. I used a 12oz jar of jam, but you can buy a bigger jar if you want a thicker fruit layer.
Don't mind the crumbs, I started sprinkling before I remembered to take the pic of the jam layer...

Once the jam is down, take the remaining crumbs and sprinkle them on top. Once you are done sprinkling, you can pat the crumbs down semi-gently.

This gets baked for a little over 20 minutes.

When it comes out of the oven, let them cool completely, and then you can cut and serve!

Easy!! And tasty!! My favorite kind of recipe!

This recipe is actually very versatile, because you can vary the kind of cake mix, and kind of jam. How about chocolate cake with raspberry jam? Or lemon cake? White cake with cherry or blackberry jam? There are plenty of specialty jams out there at stores such as Wegman's or Harry & David's, and I'm sure most of them would pair wonderfully with a basic cake mix. Or, you can try lemon or lime curds, pumpkin or apple butters, or a combination of jam and curd -- maybe some nice lemon curd and blackberry jam?

And, this bar doesn't have to be refrigerated, which makes it a great take-along item for a party or picnic!

Raspberry Oat Bars
(Printable Recipe)

Ingredients

  • 1-18.5oz box yellow cake mix
  • 1 3/4 sticks butter (14 tbls), melted
  • 2 1/2 C quick-cooking oats
  • 2 tsp vanilla
  • zest of 1 lemon
  • 1-12oz jar of seedless raspberry jam
  • 1 tbls fresh lemon juice


Directions

  1. Preheat oven to 375F
  2. Combine dry mix and oatmeal in a bowl
  3. Add melted butter, vanilla and zest to oatmeal/cake mixture, and mix thoroughly
  4. Pat 1/2 of crumbs down in a 9"x13" pan, patting firmly
  5. Combine jam and lemon juice until smooth
  6. Spread jam on top of crumb layer evenly
  7. Sprinkle second 1/2 of crumbs on top of jam layer, patting down gently when finished
  8. Bake at 375F for 18-23 minutes, until golden brown.
  9. Take out and let cool
  10. Slice once cool. Can be stored, covered, at room temperature

Raspberry Jam

Tuesday, 27 July 2010

Triple Berry Pie. Make this now.

Wow. All I can say is, wow. I tried making a triple berry pie on a whim, not really expecting much from it, and I just might have found my favorite fruit pie. Ever. No mean feat, since it had some stiff competition from blueberry and cherry, not to mention key lime and lemon meringue.  But this pie has an edge, at least for my tastebuds. Not only that, but it is incredibly easy to put together. You can probably use any combination of berries you want, adjusting the sugar content accordingly, but I went with fresh blueberries, raspberries, and blackberries.


Ingredients:

  • Dough for a 2-crust pie (your favorite recipe or refrigerated)
  • 1 pint blueberries
  • 12 oz raspberries
  • 12 oz blackberries
  • 1 C sugar (can adjust up or down depending on your tastebuds and sweetness of berries, but 1 C was perfect for mine)
  • 5 tbls cornstarch
  • 1 tbls AP flour
  • ¼ tsp salt
  • 1-2 tbls lemon juice, depending on how tart you like your pies (I used 1 tbls)
  • Butter for dotting filling
  • Milk for brushing crust
  • Sugar for sprinkling on crust

Directions:

  1. Preheat oven to 450F
  2. Combine berries, sugar, cornstarch, salt, and lemon juice in a bowl
  3. Line a pie plate with bottom crust. Spread 1 tbls flour on the bottom of crust, to prevent crust from getting soggy
  4. Spoon filling into the crust and dot with butter.
  5. Place top crust over filling and seal. I chose to make a lattice crust (look here for a great tutorial), but you can also use a full top crust with vents cut out if you wish. However, as you can see, a lattice crust really shows off the ruby red filling to perfection.  A dual-blade pastry cutter is a nice tool to have for lattice crust-making, it will add lovely little crimps to your dough strips.
  6. Brush the top crust with milk and sprinkle with sugar
  7. Place a protective shield around the crust edge to prevent excess browning
  8. Place the pie on a parchment-lined cookie sheet, and bake for 15 minutes
  9. Lower oven temp to 375 and bake an additional 40-45 minutes, until crust is golden brown. Keep an eye on your crust, different crust recipes might brown at different rates depending on the amount of butter in the dough.
  10. Let pie cool on rack. If you cut the pie too soon, it will run. It needs to sit for several hours at a bare minimum to gel. I waited until the next day to cut mine, and the filling was perfect.


This pie was fabulous. It looked spectacular, was possibly the best smelling thing I’ve ever baked, and the filling was divine. The combination of berries gave the pie an incredible complex flavor that was slightly tart, as a fresh fruit pie should be. Alone, or paired with vanilla ice cream, this pie was a huge hit when I brought it to work, and I can’t give it enough accolades. I’m definitely going to the store to purchase some more berries, I want to make this pie several more times this summer!

Tuesday, 25 May 2010

Berry Buttermilk Cake


A slice of Strawberry Buttermilk cake!  


It's quick, it's easy, it uses up extra berries -- the Berry Buttermilk Cake! This is a great, light, fruit-based recipe for summer! I found it originally on Epicurious, paired with raspberries. You could use any type of berry however, and I made one version with sliced strawberries, and one with raspberries. Any berry would work here, including blackberries, blueberries, and (pitted) cherries.


Quick note about ingredients: you don't have to go out and buy buttermilk just for this recipe (or any recipe for that matter). I sure didn't. In order to make buttermilk, you just add 1 tbls of lemon juice or white vinegar to 1 C of milk, and let it clabber for about 10 minutes, until it thickens. Conveniently enough, this recipe already calls for lemon zest, so you can zest a lemon, squeeze it, and then add 1/2 tbls of the juice to 1/2 C milk to get the 1/2 C of buttermilk the recipe calls for. I even used 2% milk because it was all I had in the fridge, and it worked great!

Raspberry cake before baking

The ingredients list looks long, but it really isn't. This cake comes together fast, and bakes even faster. And then you get this:

Yum!


Strawberry...

or Raspberry~
Ingredients
  • 1 C AP flour
  • 1/2 stick unsalted butter, softened
  • 2/3 C sugar
  • 1 egg
  • 1/2 tsp baking powder
  • 1/2 tsp baking soda
  • pinch of salt
  • 1 tsp vanilla extract (if you are making a cherry cake, almond extract might work better)
  • 1/2 tsp lemon zest 
  • 1/4 tsp cinnamon (optional, best with blueberries or strawberries)
  • 1/2 C buttermilk (see above)
  • 1 C berries
  • additional sugar for sprinkling
Directions
  1. Zest your lemon. Squeeze the juice if you are making you own buttermilk, and clabber the milk (above)
  2. Preheat oven to 400F
  3. Butter and flour a 9" round pan
  4. Combine dry ingredients (flour, baking powder and soda, salt, and cinnamon) in a bowl and set aside
  5. Cream butter and sugar until light and fluffy, then add in vanilla and zest, then the egg
  6. Add flour in 3 batches, alternating with buttermilk (starting and ending with flour). Mix until just combined each time
  7. Pour batter into cake pan, smoothing out top if necessary
  8. Scatter berries over top (I ended up using a little less than a cup of strawberries, but about a cup of raspberries),and sprinkle with sugar (about 1 1/2-2 tsp)
  9. Bake for 20-25 minutes, until cake is golden and toothpick inserted comes out clean
  10. Cool in pan 10 minutes, then depan and cool completely. Invert onto a plate.
  11. Pair with whipped cream or Cool Whip and enjoy!
This cake is delicious. Moist, light, only slightly sweet, and pairs wonderfully with whipped cream or Cool Whip. In fact, both berry versions of this cake tasted even better the next day, when the flavors had a chance to meld a bit more. I could definitely taste the lemon zest more in the raspberry cake, presumably because I made that cake without cinnamon, and it was a wonderful pairing. I can't wait to try it with blueberries. This recipe is definitely a great go-to cake, light and refreshing. I got raves when I brought it into the office (both times). It disappeared before 9am.

Raspberry with a hint of lemon! Delicious!

I have a mind to double this recipe and make one cake with strawberries, and one with bananas, and then assemble the whole thing with whipped cream as a layer cake.

Tuesday, 30 March 2010

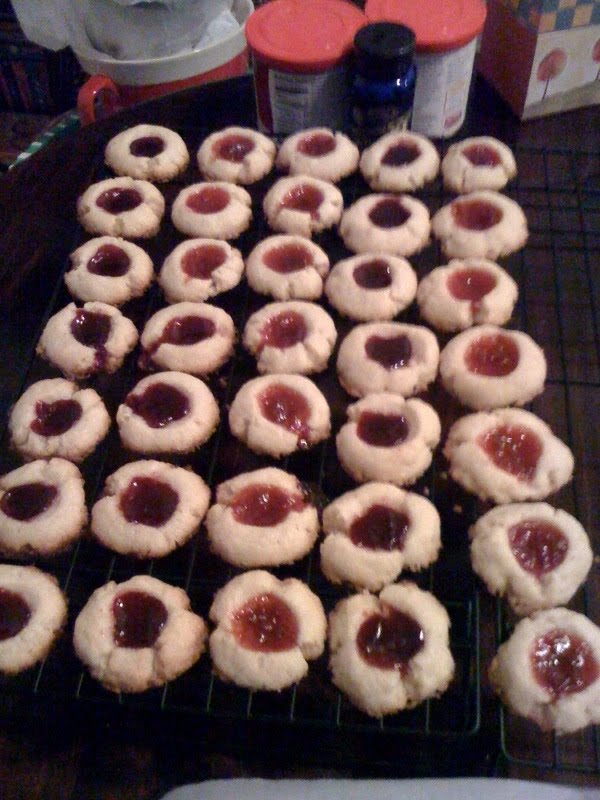
Thumbprint Cookies (Strawberry Rhubarb and Raspberry)

Last month, my cousin Jennifer brought cookies to my house, delightful little thumbprint cookies. They were perfect, with their jeweled colors and melt-in-your-mouth buttery goodness. But do you know what made them extraordinary? My husband loved them. My husband, who is indifferent to almost all baked goods known to man, not only ate them, but pronounced them his favorite cookie of all time.

Well.

That was that, as they say. I've never had any desire to make fruit thumbprints before (I inevitably lean towards cookies filled with chocolate etc), but I immediately requested the recipe from my cousin, so I could take a look at it. A little searching turned up the fact that this recipe originally came from the book Williams-Sonoma Collection: Cookies, under the moniker of "Ruby Jewels."


The recipe itself is very simple to put together, with one brief spell in the refrigerator. The cookie dough is close to a basic shortbread dough, meaning that it has a 1:2:3 ratio of sugar to butter to flour and no leavening agent. Incidentally shortbread gets its name from one of the original meanings of the word "short" -- crumbly. To "shorten" literally used to mean to make something crumbly, which is why we now call any fat that can be used to make a crumbly texture "shortening." Shortcake (as in strawberry, etc) is almost exactly like shortbread, except with a leavening agent, and potentially with vegetable shortening replacing some or all of the butter.

A brief word about jam choices. My cousin made these cookies with Smucker's Seedless Red Raspberry jam. I used the same, but I also wanted to try some different flavors. I really had my heart set on strawberry rhubarb, because I love strawberry rhubarb pie in the summer, but the rhubarb season is so darn short. When I tasted my cousin's cookies for the first time, I thought how perfect it would be to capture that flavor in a cookie that could be enjoyed all year round. There are several recipes out there for homemade strawberry rhubarb jam, but I admit, I was intimidated. Luckily, I found what I was looking for in the mall of all places, at Harry and David's. They carry a strawberry rhubarb conserve which is available all year. It has chunks of fruit in it, but they can be reduced with a few seconds in the food processor if you want (or you can do what I did and just scoop the jam out from between the fruit bits). If you have a store in your local mall, check them out. Besides the strawberry rhubarb, there were a few other jam varieties in there that I had my eye on for future cookie-making, including: bing cherry, marionberry, blackberry, and blueberry. There are also some lovely apple and pumpkin butters that might be good for the autumn, I'll be looking into those in a few months.

I only took one picture, of the finished cookie, but believe me, they are easy. I used a spoon instead of my thumb to make the indentations because I found that this way produces a well with higher walls, and I lose less filling during baking.

The dark filling is raspberry, the lighter one is strawberry rhubarb.

 Ingredients
1 C cold sweet butter, cut into pieces
2/3 C granulated sugar
2 1/4 C AP flour
2 egg yolks
1 tsp vanilla
fruit jam 

Directions
 * This recipe can be made entirely in a food processor, or with a stand mixer and paddle. I used the mixer because I didn't feel like cleaning my food processor. They came out great, so don't worry if you don't have a processor.*
  1. Preheat oven to 350°F
  2. In a small bowl, whisk the egg yolks and vanilla together, set aside.
  3. Combine the flour and granulated sugar in a mixer with the paddle attachment or in a food processor/mixer and process just to blend. For Mixer: Sprinkle the butter onto the flour/sugar mixture and mix on medium until the mixture looks crumbly, this won't take long. Add in the egg mixture and mix until the dough pulls away from the side of the bowl. For Processor: With the machine running, add the butter 2-3 pieces at a time and process until the mixture looks crumbly. With the machine still running, add the egg yolk mixture and process until blended and the dough begins to pull away from the sides of the bowl.
  4. Refrigerate until chilled, about 30 minutes. I leave it in the bowl and cover the top with saran wrap.
  5. Line cookie sheets with parchment paper.
  6. Using a #60 scoop, scoop out dough and roll it into a ball with your hands. Place dough balls on the sheet.
  7. Flour the back of a 1/2 tsp measuring spoon (you will have to keep reapplying the flour), and push the back of the spoon into the cookie until the dough is pushed up even with the rim of the spoon. Be careful not to push all the way through. The cookies will crack a little bit, which isn't tragic as long as the walls of the imprint are intact -- otherwise the filling will run out while baking. If they crack too much, repair as best you can, or re-roll the cookie and try again.
  8. Using a spoon or a pastry bag fitted with a plain tip, fill each indentation with about ¼ teaspoon jam.
  9. Bake the cookies until the edges are golden, 15-20 minutes.
  10. Let the cookies cool completely before transferring the cooled cookies to wire racks.
I had the fleeting thought that a dab of peanut butter underneath the jam would be perfection. My husband insists that this is over the top, but I think I will try it anyway...