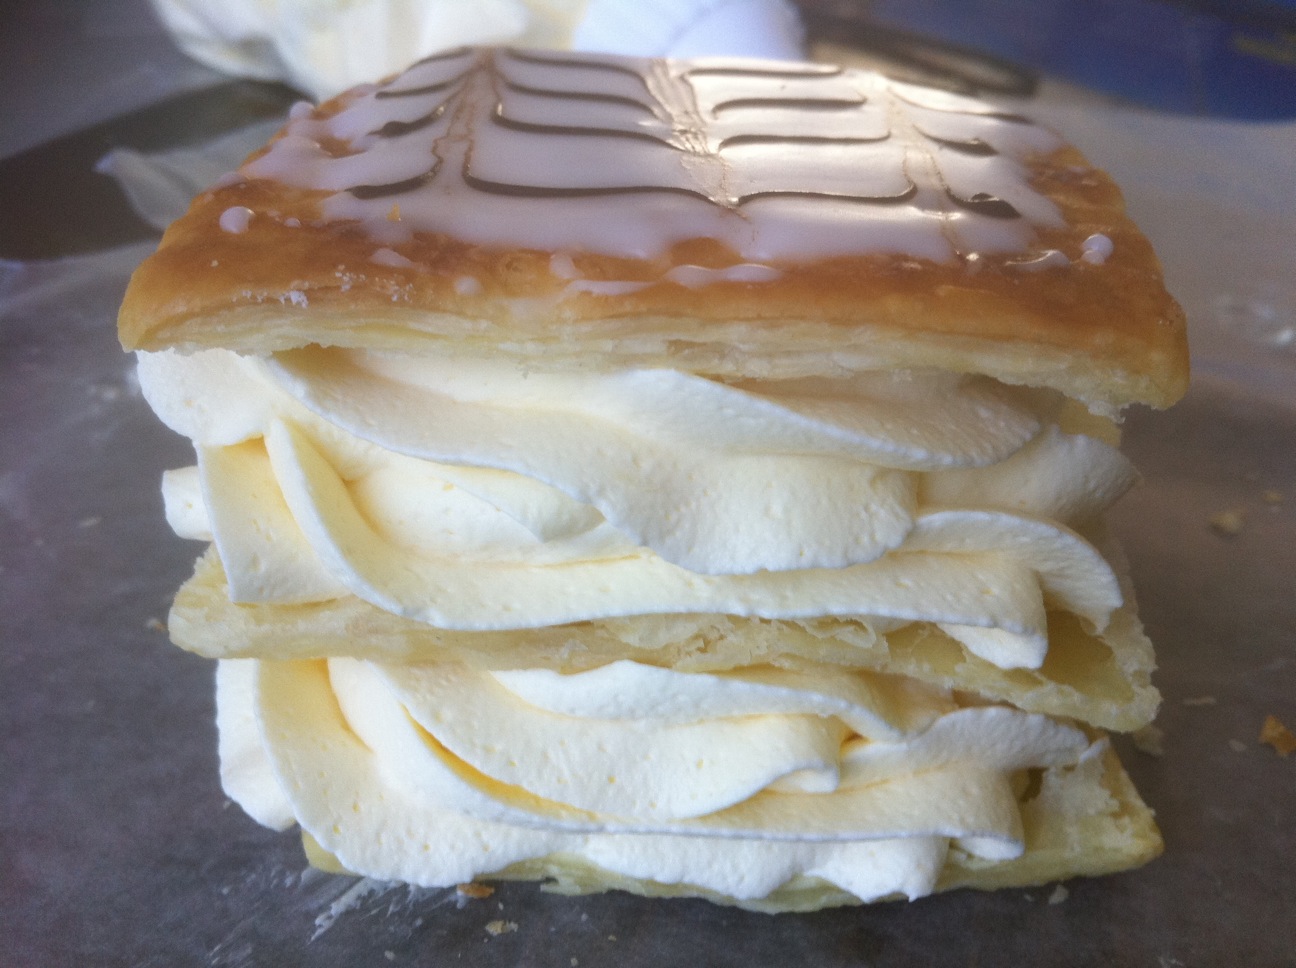
Tender flakes of pastry interspersed with creamy filling, and topped with a sweet glaze with just a hint of chocolate, napoleons might very well be the stuff from which dreams are made. Learning to make them was initially a little daunting for me, a baking hobbyist, because they look so complicated…and French…and professional…and French…but I’m here to say that with a few good recipes – and the help of Pepperidge Farm – anyone can make bakery-worthy napoleons in their own kitchen. And if it is a “wow” reaction you crave when presenting your baked goods to the general public, trust me, these things more than “wow.”
Napoleons, French though they may be, actually have nothing to do with the diminutive dictator of the same name. Only called napoleons in the US, they are actually referred to as mille-feuille in France (shortened from gâteau de mille-feuille), literally “cake of a thousand leaves” as a reference to the puff pastry they contain. In England and Australia, they are commonly called “vanilla slice” or “cream slice.” The mille-feuille predates Bonaparte by at least a century, with the oldest extant recipe dating from the “Cuisinier François” published in 1651. The traditional napoleon consists of 3 layers of puff pastry filled with cream patissiere (a starch-containing custard), but they can also be filled with jams and whipped cream. In Italy, in addition to dessert pastries, they are also made as savory pastries filled with spinach, cheese and pesto.
What makes this post a particularly easy one is that the most labor intensive part, the puff pastry, is already done. Pepperidge Farm sells a wonderful frozen puff pastry that is relatively easy to work with, all you have to do is let it defrost at room temperature for about forty minutes. Then, you can gently unfold the pastry. When you do so, you will have 3 long strips of dough that are mostly separated. For the napoleons, I generally cut each of these strips into 3 smaller pieces, yielding 9 pieces per package, and 18 per box since there are two packs of dough per box. I made 2 boxes worth of puff pastry since I was bringing this into an office party, but you can always halve the recipe and make only one box, depending on what you want them for. You can also cut each strip into only 2 pieces, which I have done in the past…but then the napoleons will be HUGE, and I’ve learned from experience that no one will take them when they are that huge, everyone tries to cut them in half and makes a general mess of things. So. My advice is to go ahead and use 3rds, because it will save a lot of grief in the long run.

Once you have your pieces cut, place them on a parchment paper-lined cookie sheet, gently prick them with a fork 2 or 3 times, put another layer of parchment over the top, and place a cookie sheet over the top parchment. Make sure your top cookie sheet can nest inside the bottom cookie sheet, the point is to keep the puff pastry flat. I generally don’t weigh down the top sheet, but you can if you have something oven-safe to put on top. Then they go into a 400F oven for 15-20 minutes on the middle shelf (the bottoms will burn before the tops are done if they are too close to the element). They will be golden when you take them out, and you can place them on a rack to cool.

Once they are completely cooled, I always match and stack them. Choose 3 pieces of roughly equal size, and stack them together, and repeat until all of the pieces are grouped by 3’s. If you split the pieces as per the directions below, each stack of 3 pieces will represent 2 napoleons by the time you are done, and will ensure that the layers are all roughly the same size.
Now that you have your stacks ready to go, you can start splitting each piece in half to get 2 thinner layers.
Each stack will yield 6 halves (3 bottoms, 3 tops), which you can group into 2 3-layer napoleons. I generally use bottom halves as the top layer because they are flatter and easier to frost. Repeat this for all the pieces, and have the napoleon groups ready to go. Occasionally, the centers will have softer flakes that stick to the knife, like the innards of pate a choux if anyone has made cream puffs before. You can tear out that soft stuff if you want, instead of leaving it dangling in an unsightly way. Remember, the splitting step itself is fungible, and you can adjust it according to your wants. If you want to use thicker pastry, don’t split your pieces, and have each stack of 3 become 1 napoleon (I’d still use a bottom as a top layer to frost, however). If you don’t want 3 layer napoleons, make 2 layer ones. If you want 4-layer ones, go ahead, etc etc.
At the bare minimum, each napoleon will have a top and bottom layer of pastry. To frost the tops, you make a quick confectioner’s sugar glaze, and pipe or brush it onto the tops. Before it hardens, stripe melted chocolate in thin lines across the top, and drag a toothpick perpendicularly across the lines in alternating directions to create the distinctive pattern found on the tops of napoleons. You can make your own disposable piping bag for the chocolate (or the glaze for that matter) with a ziplock bag. If you are doing this for the chocolate, snip off a teeny tiny part of the corner (I mean miniscule!) and you can squeeze out the chocolate in stripe from this, and then just throw the bag away when you are done. These tops can harden while you make your filling.

Now, not gonna lie, this recipe is not difficult at all, but it can take a few hours depending on how many napoleons you are making. So, if you want, you can stop at this point and store all the pieces (once the tops are dry) covered at room temp until the next day. If you have a carry along case meant for a rectangular cake, that is ideal since you can leave the pastry stacked into layers.
I adapted the pastry cream recipe from
this recipe from Paula Dean. When I make these, I make the full recipe cream, but even if you were short on time and just made the pudding part to fill them, they will still be delicious. I promise. The filling has two parts. The first consists of beating cream cheese and condensed milk until well combined, and then folding in either freshly whipped cream or Cool Whip. Do yourself a favor and have a little taste of the cream cheese/condensed milk mixture before you add whipped cream. Isn’t that tasty? It would make a great base for a fruit tart. Just sayin’. The second part is making 2 boxes of French Vanilla pudding with cream and milk, and whipping until stiff. Make the pudding in the biggest bowl you have, because then you fold the cream cheese mixture into the pudding mixture. I was burned once, and I couldn’t fit all of my cream cheese mixture in the bowl with the pudding. It wasn’t a tragedy, they still tasted great. But forewarned is forearmed, so if you have a big bowl, now’s the time to bust it out.
 |
| Pudding plus cream cheese mixture equals filling goodness! |
Once everything is combined to your satisfaction, you can fill and layer. I generally do this on a piece of wax paper on the table, since it is easier to slide the napoleons off the table than trying to pick them up from the sides. I like piping the filling because I have more control, and you can do the same, with or without a tip. I used my 1M tip because I wanted the filling to look semi-fancy, but that isn’t necessary. You can also just use a ziplock bag with maybe a half-inch wide snip off the corner. You start building the napoleons bottom-up, pressing each pastry layer gently down into the cream as you go. Once you have one assembled, I usually take a strip of wax paper, and wrap it around the outside.

Wax paper has a natural curvature because it was stored as a roll, and it is much easier to bend the paper in the direction of this roll as opposed to against it. The wax paper should adhere to the filling as you wrap it around, and then you can slide the napoleon off the table and gently put it into whatever container you are storing them in. The wax paper also really allows you to pack them into said container, because you don’t have to worry about keeping them separated. Store them in the fridge and enjoy at your leisure.
What generally happens when I make these is that the first few I assemble, I’m skimpy on the filling, because I’m always scared I won’t have enough. And then, towards the end, I realize that I in fact have too much filling, and the napoleon layers get fatter and fatter as I desperately try to use up all the remaining filling. It is hard to gauge, so don’t worry overmuch. Skimpy or fat, they’ll still be delish.
The nice thing about this recipe is that it can be as simple or as complex as you want. The number of layers, types of filling and the amount of filling can all be customized. Want to add a layer of jam, fruit, or chocolate with the cream? What about a yummy layer of bananas next to the cream? Want to just use sweetened whipped cream as the filling, or just pudding? It is totally up to you! However they are made, they are sure to be both delicious and impressive!
For my gluten-free friends: I don’t know if there is gluten-free puff pastry commercially available in the US (in Europe you can find it
here, but it looks like there is a relatively easy recipe
here if you want to make it.
As an aside, I finally learned how to make printable recipe pages (and you can too
here), so ta-da! Printable recipe! If I have time, I’ll eventually go back and do this retroactively for my other recipes, but it might take a while.
Ingredients:(
Printable Recipe)
2 boxes of puff pastry
Glaze:- 1 C confectioner’s sugar
- 1 tbls water
- Handful of semi-sweet chocolate chips, melted
Filling:- 2 boxes French Vanilla instant pudding
- 3 cups heavy cream
- 1 cup milk
- 2-8oz packages of cream cheese, softened
- 1-14 oz can of sweetened condensed milk
- 12 oz Cool Whip or sweetened whipped cream
Directions:
For Pastry:- Defrost puff pastry according to package directions and pre-heat oven to 400F
- Cut each strip of puff pastry into 3 pieces, and pierce with a fork.
- Place pieces on parchment lined cookie sheet, place another sheet of parchment on top, and top with second cookie sheet. Bake for 15-20 minutes on center rack. Watch bottoms so they don’t over-brown.
- Cool pieces on wire rack until completely cool, place in groups of 3, and split each piece in half. Group 2 napoleons from the resulting 6 halves, and repeat for all pieces.
- For all designated top pieces, combine confectioner’s sugar and water, and brush or pipe onto the tops.
- Stripe melted chocolate across the tops and make pattern on tops with a toothpick dragged perpendicularly across the chocolate lines in alternating directions.
- Let tops dry.
For Filling and Assembly:- Beat softened cream cheese and condensed milk together until fluffy and well combined. Fold in Cool Whip.
- In separate (large) bowl, whip the pudding mix, heavy cream and milk until stiff peaks form. Fold cream cheese mixture into pudding mixture and fold until well combined.
- Starting from the bottom, pipe filling into napoleon, press middle pastry gently into the bottom layer of cream, and repeat for the top layer.
- If desired, wrap wax paper around the outside of the napoleon for storage
- Store in the fridge.