Tuesday 20 October 2009

The Cookie Buffet: White Chocolate Macadamia Nut Cookies

I totally dropped the ball on taking pictures of these while baking. Even though I make them all the time, this is the only picture I seem to have:

White chocolate macadamia nut cookies are one of those cookies that I make pretty often. It was the very first recipe I considered "mine" because I just threw it together one day, and it worked great.


Ingredients:
  • 2 1/2 C flour
  • 2 sticks of butter, softened
  • 1/2 C brown sugar
  • 1/2 C white sugar
  • 1 tsp baking soda
  • 2 tsp vanilla
  • pinch of salt
  • 2 eggs
  • 11 oz bag of white chocolate chips
  • 6.5 oz container of lightly salted macadamia nuts, coarsely chopped
Directions:
  1. Preheat the oven to 350F
  2. Cream the butter and sugar until light and fluffy
  3. Add eggs one at a time, and mix until well combined
  4. Add the vanilla and mix
  5. Add the flour, baking soda and salt, and mix until just combined
  6. Add the chips and nuts, and combine on low until just combined
  7. Scoop with a #60 scoop onto a parchment-lined cookie sheet, and bake for 9-11 minutes until edges start to turn golden brown.
  8. Cool on sheet 2 minutes, and then transfer to racks.

The Cookie Buffet: Pierniczki

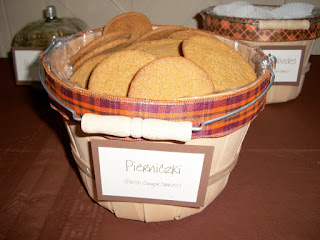
Because I had included Greek cookies in my cookie buffet, I figured it was only fair to include some Polish ones too -- the only problem was that I didn't know of any! A little research online, and I found what seemed to be the perfect cookie choice: pierniczki, a Polish ginger-honey cookie. These are traditional Christmas cookies. They are also traditionally rolled out and cut into shapes with a cookie cutter, but I decided to bypass that and convert the recipe into a drop cookie dough. In order to do that, I adapted the flour to fat ratio of one of Paula Deen's ginger cookie recipes, and tweaked it into a pierniczki dough that could be dropped by a cookie scoop.


Here is what I ended up with:
Ingredients:
  • 1 1/2 C solid shortening
  • 2 C sugar
  • 2 eggs
  • 1/2 C honey
  • 4 C flour
  • 4 tsp baking soda
  • 2-3 tsp cinnamon (depending on how you like your cinnamon)
  • 3-4 tsp ginger (depending on how you like your ginger)
  • 1 tsp cloves
  • 1/2 tsp nutmeg
  • 1/2 tsp salt
  • 2 tsp vanilla
Directions:
  1. Preheat the oven to 350F
  2. Cream the shortening and sugar until well combined
  3. Add the eggs and honey, and beat until completely incorporated
  4. Sift together the flour, baking soda, spices and salt
  5. Add to the mixture in 2 batches, mixing each time until just combined.
  6. Scoop dough with a #40 scoop onto a parchment-lined cookie sheet, 2" apart
  7. Bake about 10 minutes. Cool on sheet for 3 minutes, and move to wire racks.
And viola:

The Cookie Buffet: The Greek Cookies

When I finally decided to do the cookie buffet for my bridal shower, I knew that I had to include some Greek cookies to honor my heritage. My favorite Greek cookie of all time, finikia, is a honey-dipped spice cookie perfect for autumn, but believe it or not, I've never gotten around to making them before. I usually just make the rounds of local Greek festivals to get my fill. So, because I didn't feel like debuting yet another new recipe (I already had 2 other new cookie recipes planned), I decided to stick with what I know.

In my house, we make two kinds of Greek cookies, mostly around the holidays: koulourakia and kourambiedes. I forgot to take pictures while baking, so I included a later pic of koulourakia as an example of the traditional shape. The pictures of the cookies in the basket below are the ones from my shower.


Koulourakia
Koulourakia are Greek butter cookies, typically made around Easter time. They often have an egg glaze, and sesame seeds sprinkled on top. The dough is normally rolled into ropes, and then twisted into circles, spirals, or simple hairpin twists:


My recipe for koulourakia comes from my Aunt Sondra. Although it also calls for twisting the dough, I opted to make them as drop cookies using a cookie scoop because, well, it was just easier! My mom typically does the same thing, so I knew they would still taste great, even if they weren't in the traditional shape. Here is the recipe:

Ingredients:
  • 1 3/4 C butter
  • 1/4 C solid shortening
  • 4 tsp vanilla
  • 1 C sugar
  • 3 tsp baking powder
  • 1/8 tsp baking soda
  • 3 eggs
  • 4 1/2 C flour
Directions:
  1. Preheat the oven to 375F
  2. Cream the butter, sugar and shortening together on medium for 5 minutes (trust me)
  3. Add eggs one at a time, reserving one yolk to brush cookie tops with
  4. Add vanilla
  5. Combine baking soda, baking powder and flour in a separate bowl
  6. Add half of flour mixture to the butter mixture, and mix until just combined, then add the second half of the flour mixture
  7. Using a #40 scoop, scoop out dough and drop onto a parchment-lined cookie sheet 1" apart
  8. Lightly brush tops with reserved yolk and a tsp or two of milk


  9. Bake about 12 minutes, until golden brown
And you get about 8 dozen of these:

Kourambiedes
Kourambiedes (also spelled kourambiethes, kourabiedes, etc etc) are Greek almond cookies normally made aroun Christmas time. They are close relatives of Kahk and Mexican Wedding Cookies. The traditional shape is a crescent, but they are often formed into balls as well.

Again, I opted for balls, because drop cookies are always easier to make than a hand-formed cookie, especially when you have a lot of cookies to make! This recipe comes from my Aunt Ellen.
Ingredients:
  • 1 lb unsalted (sweet) butter
  • 1/4 C confectioner's sugar
  • 6 oz almonds, corsely chopped
  • 4 C flour
  • 2 yolks
  • 2 tsp vanilla
  • 1/8 tsp baking soda
  • 3/4 tsp baking powder
  • 3/4 jigger of whiskey
Directions:
  1. Preheat the oven to 325F
  2. Cream the butter and sugar on medium for 10 minutes
  3. After the first 5 minutes of creaming, add the vanilla, yolks, whiskey, baking soda and powder, and continue to beat for 5 minutes
  4. Add the flour in 2 batches and mix until just combined
  5. Using a #40 scoop, scoop the dough onto a parchment-lined cookie sheet 1 1/2" apart
  6. Bake for about 30-35 minutes, until bottoms start to brown
  7. Cool completely, and then roll in powdered sugar. Also, add powdered sugar to whatever container they will be stored in.
Although we store them in a cookie tin filled with powdered sugar, we tend to put them individually into cupcake cups when serving, and I know a lot of other people do the same. It is just neater.
And when you are done:
Yummy Greek cookies, ready for the taking at the cookie buffet!

The Cookie Buffet: Details

I knew fairly early on that I wanted a sweets buffet as part of my bridal shower. Well-coordinated candy buffets have such a stunning effect, that I fell in love with the idea of a Halloween or autumn themed candy buffet, something gorgeous like this or these. But, budgets are always an issue, so I downgraded to the idea of a Halloween candy buffet, for the reason that there would be plenty of Halloween candy around in the middle of October, so it would be easier and more economical. I was right on this point, it would have been cheap (relatively) and easy, but something about the concept of a Halloween candy buffet 2 weeks before Halloween still wasn't sitting right with me. And then I hit upon a great idea, and I have no clue why I didn't think of it earlier: a cookie buffet filled with homemade cookies!


This had all the elements I wanted: homey, rustic, baked, etc etc. And although I love baking anything and everything, cookies make me especially happy. So I chose my cookie types and got to baking, starting about 3 weeks before my shower. And I had to figure out a way to turn this: into the cookie buffet of my dreams!


I started with containers, I wanted something to remind me of fall, with a rustic feel. While I was at Michael's, I saw these great apple bushel baskets (I think they are technically 1/4 of a bushel baskets, or maybe 1/2), so I decided to use those. But I knew right away that I'd want to line them with something, to protect the cookies from the baskets and vice versa. I figured that some of those large cellophane bags meant for gift baskets would work well. So, I bought some wide (1.5") ribbon in fall colors:
and used a combination of double-sticky tape and a glue gun to adhere the bags to the baskets, and then the ribbons around the rims to hide the bag edges. I ended up with this:
which pretty much looked exactly how I had envisioned.
Now, all of the nicest candy buffets I have ever seen have these cute little signs identifying the contents of each container, and seeing as my containers were not see-through, I figured I should definitely log some sign-making time. I used rectangle labels to print out all the names of the cookies I planned to make, and then I adhered them to a dark brown cardstock backing. I made a giant Cookie Buffet sign as well, so there would be no misunderstanding at my shower as to the purpose of all the cookies!
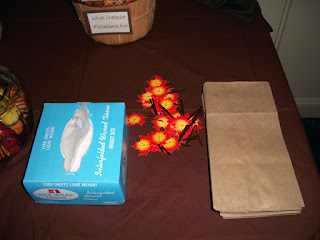
The last real thing was the goodie bags -- what would I provide for guests to take their cookies home in? I went through many ideas until I finally settled on Kraft brown paper bags, which still preserved some of the rustic feel I wanted. Plus, I found great autumn-themed twist ties that looked great paired with the bags:
Add a brown tablecloth, and this was the final product:
See that blue box next to the bags? Bakery wax paper grabs, incredibly economical, and saved me from having to buy tongs or grabbers for every container!
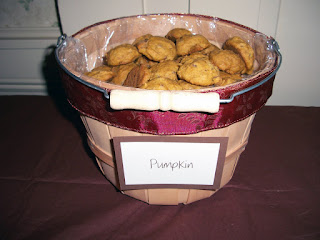
On to the cookies themselves. I made 8 different varieties. I originally wanted them all to be reminiscent of traditional autumn flavors, but then I decided to go for a mix of traditional cookies, autumn cookies, and cookies honoring my heritage (I am Greek and Polish).

Here are the Spice Cake Balls:
Pierniczki, which are Polish ginger cookies:
Gluten-free Chocolate Chip Cookies (plus candy from the local orchard in fall colors):

Koulourakia, a Greek butter cookie:
and Kourambiedes, Greek almond cookies:
All in all, it was definitey time-consuming, but I wouldn't exactly call it work. I loved every minute of baking the cookies, and I loved watching people enjoy them. I'm happy to say that, after making and displaying 56 some-odd dozen cookies (I averaged at least 7 dozen per type), there were only crumbs left by the end of the 3 hours...

Aubergine Parmigiano

Oh what, what to do when you've got a dinner party for 5 and one of them is a blasted vegetarian? The answer is Aubergine Parmigiano, which you can give to veggies and non-veggies alike. Mozzarella, being a bit of a meaty cheese, is a marvellous substitute for carnivores - no-one will notice it's meat-free - and it has the summery tang of a lasagne, without being stuffed full of pasta.

A thing to beware with this recipe is that you must salt your aubergines properly before use  - even though it's a bit of a hassle - or they will leak water like mad when they are cooking and you will get a horrible watery sludge at the bottom of your pan - yuk.

To salt aubergines, cut them into rounds or into strips, about 1cm thick and lay out flat. Salt both sides and then lay chopping boards over the top and press down with something very heavy, like a couple of big cookbooks. Leave for 30 mins and then rinse off the salt and any leaked water - then they are ready to use.

For 4 people you will need:

3 aubergines
400g mozzarella
1 jar passata (or just make your own with chopped tomatoes fried with onions and garlic)
bunch of basil
salt and pepper
approx 80g parmesan, flaked
oil for cooking - prob best to use groundnut oil so it can get v hot without burning

1 Switch oven on to 180C. Cook your salted aubergine slices in oil until golden-ish and leave to drain on kitchen roll (aubergines really drink oil, so make sure to have a lot on standby).

2 In a large gratin dish or casserole, start layering up your ingredients like a lasagne; one layer aubergine, then mozarella, then basil, salt & pepper, tomatoes and parmesan flakes. Do this until you've run out of stuff. Finish off the top with mozarella so that it goes brown and bubbly in the oven. Bake for 1 hour

This reheats very well, so make more than you need and if it doesn't get eaten shove it in the oven for later.

Monday 19 October 2009

Bridal Shower Preparations: Little Details

As a scientist, I am very detail-oriented. I love details. Big details, little details, any minute way to tie together a theme: I'm there. The great thing about fall is that there are so many little ways to incorporate an autumn-theme into what you are doing. But be careful, not to overdo it, or it might end up looking like this:
This was my house prior to leaving to go set up for my shower. Yes, all those boxes on the floor were just to set up for the shower. It was a lot of work to put together, but I wouldn't change it, I loved how it turned out!
The flowers below I bought the year before, on sale. I bought up all of the flowers that I thought would make nice centerpieces, and then my mom and I arranged them into awesome copper pails I found at A.C. Moore for $1 each (just as awesome for the price as for the look)! In the below pic, they are in the boxes already in their pails, so you can get a feel for how the arrangements were put together. I have a picture of a table a little further down, so you can see the pail too.


A long time ago, I had seen these Bride and Groom Apples online, and fell in love. And since I had made Apple Favors, they fit in with my theme perfectly. But they were so expensive! So I bought some Wilton camdy melts in white and midnight (hooray for it being Halloween season!) and tried my hand at making my own:

I wasn't really expecting much, so I have to say that I am pretty pleased with how they came out!
Here is the Mr...

And Mrs.!
I was a little haphazard because I was really just experimenting, but they came out nice enough that I displayed them on the punch table at my shower. The Bride Apple's necklace is made out of silver dragees that I dipped carefully in white chocolate and make into a necklace-like pattern.

Unfortunately I have no pictures of them at the moment, but I enclosed autumn recipe cards in my shower invitations with instructions to share a recipe with me. This is the holder I got to keep the cards in...


Gartner Studios makes escort cards lined in pearl in either white or ivory. Ivory was a perfect fit, so I printed escort cards in the brown font I was using for everything. As an added touch, I punched a hole into each escort card, and inserted a maple-leaf shaped brad in either red, orange or yellow:

And here are some shots of the tables at the shower, with brown napkins, the flowers and pail centerpiece, and booklets that I designed and printed up. These booklets housed, amongst other things, Bridal Bingo. I also sprinked fall leaves and the occasional mini-pumpkin or gourd here and there. And, of course, the apple favors:
Here is a closed shot of a strange looking "apple" -- it's actually a caramel covered pear that I made for one of my bridesmaids since she is allergic to apples. It didn't come out quite as pretty as the apples (hence why I didn't dip the apples myself), but I am assured that it still tasted yummy!
Next up: Cookie Buffet, with each cookie recipe posted individually. I made 7 different kinds of cookies, plus spice cake balls!

Bridal Shower Preparations: Favors and Prizes

As a December bride who also dearly loves autumn, I just couldn't pass up the opportunity to plan my October Bridal Shower! The next several blog posts will be bridal shower-related, and although there will be a few which are not directly baking-related, most of them eventually come around to baked goodies in the end (or at least are related to baking).

My shower was this past October 11th of '09, not even two weeks have gone by yet. I hatched on the idea of a fall themed bridal shower pretty early on, in the fall of '08 in fact, which made it a lot easier since I was able to buy a lot of my items last year after the season, at a pretty steep discount. If you have the time to plan, I highly recommend doing the same.


I saw these invitations online, and fell in love with the whimsical design of the falling leaf. The falling in love concept is one that I keep returning to, leaves in October, snowflakes in December. I decided to match the cream color of the invitations and the brown throughout the entire shower.

I knew pretty early on that I wanted caramel apples as favors, and looking online, I thought that diamond-shaped hang tags around cellophane-wrapped caramel apples would fit into my rustic harvest theme perfectly. So I ordered some hang tags that were inkjet compatable, and designed some labels using the leaf motif from the invitation, which I colorized and photoshopped. Pretty close to what I had envisioned!
At first I was thinking that I would use curling ribbon to tie on the tags, but then I spied some lovely raffia (for those who don't know, the strips are made from dried raffia palms) in autumn colors that had the perfect rustic feel that I wanted. So I bought up every fall color I could find. Sadly, there was no true orange, however there was a lovely rusty orange that I paired with the yellow for a lovely effect.

The apples themselves are from Shop Rite. I had investigated ordering them online (too expensive!), and I had so many other things to do, I just didn't feel that I would have the time to dip 65 apples. But a word of advice to anyone who wants caramel apples as favors for anything...talk to the produce manager at your local grocery store. Sam and Jack at the Spotswood Shop Rite were both great, and had no problem ordering my apples for me, which I purchased for the same price as they were in the store (no extra shipping)! They cost me 0.83 cents per apple, a pretty good price considering the quote most candy shops and orchards quote!
And they turned out just lovely:
One of my bridesmaids, Rachel, came over to help me with wrapping them the morning before the shower. And they were a huge hit!

Now, for the games...I am not a huge bridal shower game person. In fact, they mostly make me cringe. But there are 2 games I decided were acceptable: Bridal Bingo, and the Timer Game. Now, most of you are probably familiar with Bridal Bingo, but let me explain the Timer Game. It is the easiest game ever -- a timer is set to certain intervals while the presents are being opened. If it rings when your present is being opened, you get a prize. It's as simple as that. I like both of these games because they give people something to do while the presents are being opened, without requiring too much effort on the part of guests. So, for my two different games, I needed two different prizes. I wanted them to be fall-related, and also baking related.
For the timer game, I chose ceramic pie plates (with recipes printed in them) in fall colors and flavors - orange/pumpkin, red/apple, brown/pecan, etc. All of the dishes had a colored rim that matched the recipe printed on them, which looked very festive. I had found special fall-themed cellophane meant for dishes and such (as well as smaller matching bags), so I used that to wrap the prizes and distinguish them from the favors.
You can just see the recipe printed on the inside of this pie dish, I believe this one is cranberry apple pie...
And here is one of the pumpkin pie plates. I only had 5 of these because they were a more expensive prize. By setting the timer to every 20 minutes, I was able to make these prizes last for the entire gift-opening.
For the Bingo prizes, since I needed more of them, I chose small ceramic loaf pans with fall motifs on the side.

But because I figured "what's a pan without a recipe??" I modified a pumpkin bread recipe, printed them out using the same font and cream paper I had been using for everything, rolled them up, and popped them into the loaf pans before I wrapped them. And I got some more use out of my "fall in love" theme in the process:

And here they are wrapped:
All in all I am very pleased with how the favors and prizes came out -- they were quaint, rustic, fall-sy (is that even a word?) and baking related. They were also a huge hit, and I hope people enjoy them!
Next up, I have some other little details about the shower that I want to share (this post is getting a little long...), and then to the focal point of my entire shower, the Cookie Buffet!!!!

Friday 16 October 2009

Nigel Slater's sticky chicken

Now this one is great. I got it from Nigel Slater's Simple Suppers (episode 4, recipe also available on BBC online) and it worked a treat.

Nigel Slater used fresh lemons and honey, but I didn't have any fresh lemons, so I used that lemon stuff you get in a bottle. And I thought I didn't have any honey (but I did, it was hiding in the larder) so I used maple syrup.

I mixed together about six long squirts of plastic lemon juice, a long slug of maple syrup, two large squished garlic cloves and some black pepper and put in four chicken thighs to marinate for about half an hour.

Then I tipped it all into a roasting tin and sprinkled over salt and baked for 45 mins at 220C, turning twice. And it was DELICIOUS, even with slightly wrong ingredients... can't recommend highly enough.

So easy, impossible to get wrong.

Saturday 10 October 2009

The pork that wasn't

It pains me that the recipe that inspired this blog was by my favourite cook, Nigella Lawson. Love her as I do, she led me a merry dance with her 24-hour slow-cooked aromatic pork shoulder. (Nigella Bites, p. 211)

I did everything she told me to and the meat came out a bone-dry, tough chewy lump of sadness. What did I do wrong?