Showing posts with label allspice. Show all posts

Monday, 4 March 2013

Impossibly Easy Pumpkin Pie


I'm continuing to (slowly) slosh my way through a backlog of posts, and this is one that I have been meaning to get up on the blog for months.

Now, I love me some pumpkin, but oddly enough, I've never posted my go-to classic pumpkin pie recipe. And today is still not that day, unfortunately. But instead, I have another variation of pumpkin pie to post -- the "Impossibly Easy" kind.

Why? I'm glad you asked. Necessity. I needed a quick pumpkin pie recipe using the ingredients I already had on hand in my pantry, which did not include pie crust, or butter or shortening, which precluded me from making a from-scratch crust (also working against me was the time factor). But, what I did have on hand was Bisquick.


Ah Bisquick. Can we take a minute to talk about Bisquick? You'd love to? Great!

Bisquick, in a nutshell, is a pre-mixed baking blend that includes flour, a leavening agent, and a fat source. The brandname stuff uses baking powder, hydrogenated oil and salt, but you can actually make your own using one cup of flour, 1½ teaspoons of baking powder, ½ teaspoon of salt, and 1 tablespoon of oil or melted butter. And according to Betty Crocker, it can be used in pretty much any baked good from pancakes to sausage balls. I've had both of those, although I haven't tried the myriad of other Bisquick recipes. And they're good...especially the sausage balls. But that's for another day.

Back to the Impossibly Easy Pumpkin Pie.

The premise is this: impossibly easy because you mix every ingredient together in one bowl, then dump it into a pie plate and bake it. While baking, the Bisquick sinks through the custard and forms a crust (of sorts) on the bottom all on its own, and voila! A pie so easy that it is ridiculous (although I'm not sure about the "impossible"). By the by, this pie used to be called "Impossibly Pie," not "Impossibly Easy Pie" when it was first introduced in 1978. The original flavor was coconut custard, and I'm assuming the name was a reference to the surprising way the Bisquick settles into a crust. I'd love to be able to tell you why Bisquick does this (and I did try to find out) but I could not find a definitive answer. I'm assuming the Bisquick sinks because the flour granules are coated in fat...but don't quote me! Somewhere along the way, "Impossible" was remarketed as "Impossibly Easy," probably to emphasize the, you know, ease of it all. The recipes were expanded to include a number of different sweet and savory pies, including pumpkin.

Now, I have to admit that I didn't follow Betty's custard recipe here. It was enough for me to know that the Bisquick would sink through the custard, so I used my own custard recipe, and just added Bisquick. 

The recipe is just as easy as it sounds: mix,

and bake.


It is hard to see in the pictures, but it really does form a crust, albeit a thin one:


Since my custard was thicker that the original recipe, I toyed with the idea of adding more Bisquick, but I decided against it. I'm not sure if it would all have settled out, and I didn't want to take the chance.

The filling really is the star here, and that's just fine with me, although part of me missed a traditional crust. I don't think this would replace my go-to traditional pumpkin pie recipe (although the custard recipe I modified for this is almost exactly what I use in my go-to recipe). But for what it is -- an easy, quick pumpkin pie with minimal ingredients, it can't be beat!


Impossibly Easy Pumpkin Pie

Ingredients

  • 3/4 C brown sugar
  • 1 can (15 oz) puree pumpkin (NOT pumpkin pie filling)
  • 1 can (12 oz) evaporated milk (low-fat is fine, if you wish)
  • 2 eggs
  • 1/2 tsp salt
  • 1 tsp vanilla
  • 1/2 C bisquick
  • 2 tsp cinnamon
  • 1 tsp ginger
  • 1/2 tsp nutmeg
  • 1/4 tsp allspice (or cloves, if you prefer)
Directions
  1. Preheat oven to 425F
  2. Grease (cooking spray is fine) a 9" pie plate -- I used glass
  3. Combine all ingredients in a bowl and mix until combined. Pour into pie plate
  4. Bake at 425F for 10 minutes, then lower the oven temp to 350F (without opening oven), and continue to bake for an additional 40-50 minutes, until center is set and dies not jiggle.
  5. Cool on wire rack. 


Wednesday, 17 November 2010

Pumpkin Pecan Cheesecake Pie


I. Love. Pumpkin. Pie. In fact, let’s be honest: I love pumpkin anything. But pumpkin pie is the very pinnacle of all pumpkin desserts as far as I’m concerned. I used to make a traditional pumpkin pie every year, but last year I went in a different direction, rolling out a brand-new type of pie, and haven’t looked back since. This new pie, the Pumpkin Pecan Cheesecake Pie, is my definitive holiday pie. It is like three desserts wrapped into one, and although it might sound busy, this pie has the most wonderful blending of flavors that results in my favorite Thanksgiving dessert.


I had always been intrigued with pumpkin cheesecakes, but I had never tried to make one before. The pie I am going to describe is a little different from a regular pumpkin cheesecake in that the cheesecake layer and the pumpkin pie layer are kept separate, with a pecan layer on top. This concept was originally inspired by Bakerella, who made a similar pie on her blog. But after reading the comments posted about that recipe, a lot of people complained that the recipe failed to give a filling that solidified properly. So I decided to try my hand at making this pie, keeping the distinct pumpkin, pecan and cheesecake layers, but completely revamping the recipe itself, starting from the ground up. The results I got were just wonderful, and that’s what I’ll be sharing in this post.

First, you need a pie crust. Deep dish if you can, there will be a lot of filling. I used the Sarah Lee 9” deep dish frozen pie crust, and it was still frozen when I filled it (although it sat on the counter after I had filled it with the cheesecake layer, and while I was assembling the pumpkin layer – maybe 10 minutes. Feel free to use your own recipe if you want, just keep a closer eye on how the crust browns, because my directions are for a crust that is partially frozen.

The first layer that goes down is the cream cheese. Start with your cheese softened, maybe sitting out at room temp for 30-45 minutes or so, cut up into cubes in your mixing bowl. Once the cheese is a little softer, you beat it with the sugar until it is well combined and not lumpy. 


Add the vanilla and a dollop of sour cream (a slightly rounded tablespoon), and beat until incorporated. Add the egg, and beat until combined and the lumps are pretty much gone. Try not to overbeat. Then, pour the cheesecake layer into the bottom of the crust.


Now for the pumpkin layer. I personally like adding each spice individually, as opposed to the pumpkin pie mix. I also freshly grate the nutmeg before I use it, and although that isn’t strictly necessary, it smells and tastes wonderful.  Combine the pumpkin, sugar, spices, salt, egg and whites in a bowl, and whisk until thoroughly combined. 

You can do that by hand, it is easy enough to combine. Then, layer the pumpkin mixture on top of the cheesecake mixture carefully. I would spoon it on gently, and then spread it out. Gently.


At this point, you put some aluminum on the crust to protect it from over-browning, and pop it into a 400F oven. After 5 minutes, and without opening the door, turn the oven down to 375F and keep baking for 25 minutes.

While it is baking, assemble the pecan topping. Combine the pecans, brown sugar and maple syrup in a bowl.


 Be sure to use real Grade A maple syrup, not the stuff you typically buy for pancakes. No Log Cabin or Aunt Jemima!

After the 25 minute bake time is up, take the pie out of the oven. You are going to be putting the pecan topping on quickly, you don’t want the pie to cool down too much. Remove the shield so that you can sprinkle pecans right to the edge of the crust, and start sprinkling the topping evenly all over the pie. I typically use all or almost all of the topping. Taking the shield off will also give you an idea of how much the crust still needs to brown. I leave those judgments up to you, because each crust and oven might be slightly different.


Put the shield back on if you think it is necessary, and pop the pie back in the over for another 20 minutes. After that time is up, try to take a peak (without opening the door if you can manage it) and see how the crust is doing. If you took the shield off, is it browning nicely or getting overdone. If it is getting overdone, put the shield back on. If you left the shield on, is it not browning enough? If not, take the shield off. This will really depend on your oven. Using the same exact crust, at my parents’ house, I had to leave the shield on the entire time to prevent excess browning, but in my apartment I took the shield off after the topping went on, and they both turned out great. The best advice I can give is just pay attention to the crust.

Let the pie bake for a further 10 minutes (so, 1 hr total bake time), then remove it from the oven and place it on a wire rack for cooling. 

Let the pie cool down at room temperature for at least an hour, if not more. If you cover it to put it in the fridge while it is too warm, you will end up with condensation building up on the inside of the cover, making the crust and pie top soggy. It doesn’t have to be completely 100% room temp before you put it in the fridge, but make sure the bottom is no more than slightly warm. If you are worried, you can do what I do and check the cover about an hour after I put it into the fridge. If there is condensation building, wipe it off with a paper towel.

This pie needs to chill for maybe 5 hours minimum, but I highly recommend overnight. It’ll make slicing and serving so much easier, plus, it just tastes better when it is thoroughly cold.


Again, this pie: my favorite rendition of pumpkin pie. The flavors are complex, and so are the textures, but you have the strong pumpkin coming through, complemented by everything else. If you are a pumpkin pie fan, consider adding this to your holiday baking list this year!


Pumpkin Pecan Cheesecake Pie

Ingredients
  •  1-9” deep dish pie crust, frozen or fresh (see notes in above text)

 Cheesecake Layer
  • 8 oz cream cheese, softened
  • 1/3 C sugar
  • 1 tsp vanilla
  • 1 slightly rounded tbls sour cream
  • 1 egg

 Pumpkin Layer
  • 15 oz can of pumpkin (not pumpkin pie filling)
  • ¾ C sugar
  • 2 tsp cinnamon
  • 1 tsp ginger
  • ½ tsp nutmeg
  • ¼ tsp allspice or cloves
  • ¼ tsp salt
  • 1/3 C evaporated milk
  • 1 egg
  • 2 egg whites

 Pecan Layer
  • 1 ½ C pecans, chopped
  • ½ C brown sugar, packed
  • 2 tbls pure maple syrup


Directions 
  1. Preheat oven to 400F
  2. Beat cream cheese with the sugar until it is well combined and not lumpy.
  3. Add the vanilla and a dollop of sour cream (a slightly rounded tablespoon), and beat until incorporated.
  4. Add the egg and whites, and beat until combined and the lumps are pretty much gone. Try not to overbeat.
  5. Pour the cheesecake layer into the bottom of the crust.
  6. Combine the pumpkin, sugar, spices, salt, egg and whites in a bowl, and whisk until thoroughly combined (can do by hand).
  7. Layer the pumpkin mixture on top of the cheesecake mixture carefully. Spoon it on gently, and then spread it out.
  8. Put some aluminum on the crust to protect it from over-browning.
  9. Bake it into a 400F oven for 5 minutes then, without opening the door, turn the oven down to 375F and keep baking for an additional 25 minutes.
  10. While it is baking, assemble the pecan topping. Combine the pecans, brown sugar and maple syrup in a bowl and stir to combine well.
  11. After the 25 minute bake time is up, take the pie out of the oven.
  12. Working quickly, remove the shield and start sprinkling the topping evenly all over the pie.
  13. Put the shield back on if you think it is necessary
  14. Put the pie back in the over to bake for another 20 minutes.
  15. After the time is up, try to take a peak (without opening the door if you can) and see how the crust is doing. Decide whether to use the shield or not based on the level of browning
  16. Let the pie bake for a further 10 minutes
  17. Remove it from the oven and place it on a wire rack for cooling.
  18. Let the pie cool down at room temperature for at least an hour before covering and storing in the fridge
  19. Overnight chilling yields the best results

Tuesday, 12 October 2010

Pumpkin Blondies


Hands down, my favorite flavor of the Fall is pumpkin -- pies, bars, cakes, soups, you name it, I love it. My Autumn baking season, roughly from September until Thanksgiving, is positively dominated by pumpkin in all its many permutations, and this post is no exception. Last year, I modified a pumpkin cookie recipe with great  success, so this year I decided to try my hand at some pumpkin bars, which are more like blondies due to their moist, dense texture. I modified a basic recipe from Martha Stewart, changing around the proportion of pumpkin, as well as the amounts and kinds of sugar, spices, and some of the mix-ins. Like my cookies, I added butterscotch chips to these in lieu of the chocolate chips that the original recipe calls for, because the combination of pumpkin and butterscotch is just too darn good to pass up!


Although this recipe is a general Fall recipe, and not Halloween-specific per se, Halloween and pumpkins are intimately linked in North America, so I'd like to take a few moments and delve into another Halloween historical interlude at the point where pumpkins and Halloween converge: the Jack-o'-Lantern.


A popular legend surrounding the Jack-o'-Lantern comes originally from Ireland. Although the specifics of the story can vary, they all follow the same relative story arc, and they all involve a sneaky and rather unsavory individual known as Jack the Smith, or "Stingy Jack." As one version of the story goes, Stingy Jack had a run-in with the Devil, who had determined that it was Jack's time to die. Jack shrewdly requested a last drink at the pub, and the Devil obliged. Since Jack had already frittered away all of his money, he convinced the Devil to change shape into a silver coin in order to pay for the drink. Once the Devil did so, Jack snatched him up and placed him in a wallet next to a crucifix, which sapped the Devil of his powers. In other versions of this story, Jack tricks the Devil into climbing an apple tree and surrounds the base with crosses. But however the story is woven, it always comes to the point where Jack has the Devil trapped and at his mercy. At this point, in exchange for the Devil's freedom, Jack extracted a promise that the Devil will never collect his soul for Hell.

Many years later, Stingy Jack dies, and herein lies the problem: he was too unsavory of a person to go to Heaven, and because of the Devil's promise, he also couldn't go to Hell. Doomed to forever walk in the dark nether region between Heaven and Hell, a frightened Jack asked the Devil how he would be able to see where he was going as he traveled alone, and the Devil tossed him an eternally burning ember from the fires of Hell to light his path and serve as a warning for others. Stingy Jack placed the ember in a hollowed out turnip, and made a lantern to light his way. He became known as "Jack of the Lantern" which was eventually contracted into "Jack-o'-Lantern."

Slightly less glamorous, Jack-o'-Lantern may have also been a generic reference to night watchmen who roamed the streets and castles of the British Isles in the mid-17th century. Whether this practice has its roots in the old Irish legend has not been established.

The term Jack-o'-Lantern has another meaning, the phenomenon of ignis fatuus,  the mysterious lights appearing over bogs and marshes which were believed to be ghostly in origin and thought to resemble a flickering candle or lantern.  What was once thought to be a byproduct of paranormal activity is today generally attributed to the chemical reactions of the organic decay that occurs in bogs -- the oxidation of phosphine, which is highly combustible in the presence of oxygen, ignites methane and results in ephemeral fires.

The first Jack-o'-Lanterns were carved in the UK out of turnips and swedes during All Hallows Eve, and placed on the doorstep to ward off the evil spirits that would roam the earth on the one night when the veil between worlds was thinnest. When Irish immigrants came to America in the mid-19th century, they brought the tradition with them but transfered the carving to pumpkins, which were larger and plentiful.The first extant reference to Jack-o'-Lanterns being carved vegetable lanterns dates back to 1837, and a specific connection to North American Halloween is established by 1866.


This recipe is fairly easy to make. The ingredients list is long because I always prefer to add individual spices as opposed to using the "pumpkin pie spice" found in stores. But the steps are short and simple.

First, gather everything you need, including the spices. For this recipe, I used a combination of cinnamon, ginger, nutmeg and allspice, although you can substitute cloves for the allspice if you wish.


You'll notice that I am using whole nutmegs. I really like the flavor (and smell) of freshly ground nutmeg, so I grate it fresh. But you can use the pre-ground stuff, and it'll turn out just fine.

This is what the inside of a whole nutmeg looks like


Then, you combine all of the dry ingredients together in a bowl, so that they are well blended. 


Cream the butter and sugars together until light and fluffy.


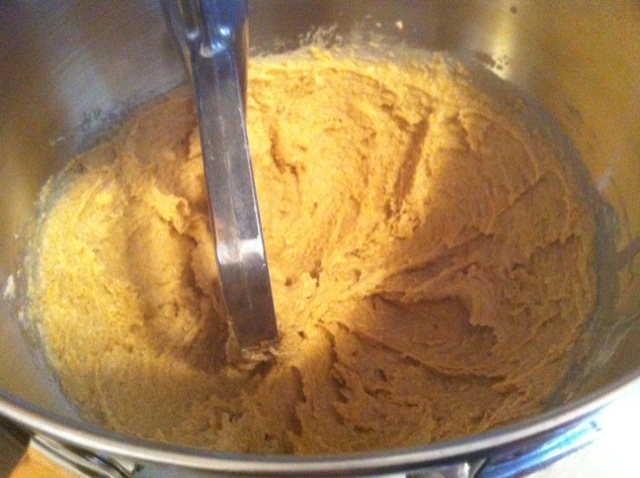
At this point you add in the egg, vanilla, and pumpkin until just combined. It'll look chunky, but it's all good, don't keep beating it trying to make the batter smooth. Add in the dry ingredients and mix until just combined.


Fold in those butterscotch chips and pecans, and spread it in the pan. The batter is thick, so you will have to actively push it to all the corners. Make sure everything is even!


And then you bake them up for about 40 minutes. You'll know they are done when they just start to pull away from the pan. A toothpick inserted in the center should still have just a few moist crumbs.


I'd cool them completely before cutting, because they need to firm up. I'd suggest at least an hour or so at room temp, followed by at least a half hour in the fridge, if not a full hour.


I was a little worried about this recipe at first, because when they baked, they puffed out like pumpkin bread -- which was fine, but I was really hoping for a brownie consistency. But, by the time they cooled, they sank back down into a lovely, dense and moist bar. Once again, I think that the combination of pumpkin and butterscotch chips works wonderfully, these bars were incredibly tasty, and easy to put together and bake. These are a great and quick Fall treat!


(Printable Recipe)

Ingredients

  • 2 1/3 C flour
  • 2 tsp cinnamon
  • 1 tsp ginger
  • 1/2 tsp nutmeg
  • 1/4 tsp allspice
  • 1 tsp baking soda
  • 3/4 tsp salt
  • 2 sticks butter, unsalted, softened
  • 1/2 C sugar
  • 1 C dark brown sugar (can substitute light)
  • 1 egg
  • 2 tsp vanilla extract
  • 1-15 oz can pumpkin puree (NOT pumpkin pie filling)
  • 11 oz butterscotch chips
  • 1 C chopped pecans

Directions

  1. Preheat oven to 350F, and spray a 9x13" pan with butter spray
  2. Combine dry ingredients into a bowl (flour, spices, baking soda, salt) and set aside
  3. Cream butter and sugars together until light and fluffy
  4. Add in egg, vanilla and pumpkin and beat until combined (mixture may look chunky)
  5. Add dry ingredients and mix until just combined
  6. Fold in butterscotch chips and pecans
  7. Spread batter into prepared pan. The batter is thick by this point, so you will have to push it, but try not to pack it down. Try to spread as evenly as you can, so that the batter is of uniform thickness.
  8. Bake about  40 minutes. An inserted toothpick should come out almost clean (a few crumbs), and the bars should just begin pulling away from the sides.
  9. Cool in the pan before cutting. I recommend keeping them in the fridge for at least 30 minutes before cutting them.