Friday 24 August 2012

Lemon Ricotta Cookies


I do love my lemon, and I will not apologize. I like it strong and unabashedly tart, especially in desserts. So I decided to give this recipe by Giada a whirl -- lemon ricotta cookies. Now I've used ricotta cheese in desserts before, but never as part of a cookie batter, so I was anxious to try it out.


These cookies are fairly easy to assemble, just start by zesting and juicing some lemons.

Cream butter and sugar.

Add the eggs, cheese, lemon juice and zest.


Add in the dry ingredients (premix the dry ingredients together in a separate bowl first).


Drop onto a parchment lined cookie sheet with a #40 scoop (or about 2 tbls per cookie)


Bake about 15 minutes but watch them carefully, it is easy to burn the bottoms. When the edges just start to turn golden, they are done. 

Have your glaze (powdered sugar, lemon juice, lemon zest) ready to go. The cookies need to set on the cookie sheet for 20 minutes before they can be moved to a cooling rack, and this is the perfect time to glaze them, while they are still warm (the heat will help you spread the glaze more easily). Spoon on the zest, and use the back of the spoon to gently spread the glaze. Be careful, the cookies are delicate, you don't want to rip the tops.


The glaze needs about 2 hours to fully set before you can think about packaging them. I was very surprised by the texture of these cookies. They were almost pillow-like, soft and chewy, with a great lemon flavor.


You'll notice on the bottom, there are two ingredients that I put a range for rather than an absolute value. The first is the amount of sugar in the cookie batter. Giada's original recipe called for 2 cups, but I (and some other reviewers) thought this was too sweet) used 1.5 cups of sugar instead. I really wanted the lemon flavor to shine through, so I dialed down the sugar. I loved how mine turned out, but I am really picky about lemon-flavored desserts, the cookies might have more general appeal with 2 cups of sugar in the batter, I don't know.

The second range is the amount of zest in the glaze. I have doubled the glaze recipe, because the amount Giada called for was rather small, and the bulk of the lemon strength comes from the glaze so I didn't want to skimp on it. Keeping the proportions the same as Giada's glaze, this glaze recipe should call for the zest of 2 lemons. I liked the zest at this strength, some found her glaze proportions too lemony, so if you just want a nice hint of lemon, use 1 lemon worth of zest in the glaze instead of 2.

Also, for giggles, I tried these cookies with lime juice and zest instead of lemon, and sprinkled some toasted coconut on top. These were also quite good, and in retrospect, toasted coconut would be a fine addition to the lemon version as well. Just make sure to sprinkle the coconut on before the glaze sets, otherwise it won't stick.


All in all, I was quite pleased with how these lemon cookies turned out. I think they are a great choice for a lemon cookie, especially if you want something that tastes a little fancier. These would be a great cookie to serve with afternoon tea!


Lemon Ricotta Cookies


Ingredients

Cookies:
  • 2 1/2 cups all-purpose flour
  • 1 teaspoon baking powder
  • 1 teaspoon salt
  • 1 stick unsalted butter, softened
  • 1.5-2 cups sugar
  • 2 eggs
  • 1 (15-ounce) container whole milk ricotta cheese
  • 3 tablespoons lemon juice
  • 1 lemon, zested

    Glaze:
    • 3 cups powdered sugar
    • 6 tablespoons lemon juice
    • 1 tbls vegetable oil
    • 1-2 lemons, zested
    • toasted coconut (optional)

    Directions
    1. Preheat the oven to 375 degrees F.
    2. In a medium bowl combine the flour, baking powder, and salt. Set aside.
    3. In the large bowl combine the butter and the sugar. Using an electric mixer beat the butter and sugar until light and fluffy, about 3 minutes. 
    4. Add the eggs, 1 at a time, beating until incorporated. 
    5. Add the ricotta cheese, lemon juice, and lemon zest. Beat to combine. 
    6. Stir in the dry ingredients.
    7. Line 2 baking sheets with parchment paper. Spoon the dough (about 2 tablespoons for each cookie or a #40 scoop) onto the baking sheets. 
    8. Bake for about 15 minutes, until slightly golden at the edges. 
    9. Remove from the oven and let the cookies rest on the baking sheet for 20 minutes.
    10. FOR GLAZE: Combine the powdered sugar, lemon juice, and lemon zest in a small bowl and stir until smooth. Spoon about 1/2-teaspoon onto each cookie and use the back of the spoon to gently spread. Sprinkle on toasted coconut if using.
    11. Let the glaze harden for about 2 hours. Pack the cookies into a decorative container.

    Tuesday 21 August 2012

    Zucchini Bread


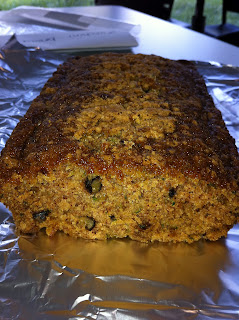
    I happened upon this recipe, which I modified slightly from Paula Deen, when I had an overabundance of zucchinis to consume from last year's farm share (more about farm shares in another post). It is a simple and tasty quickbread recipe that will yield 2-9x5" loaves, plenty to eat and share!


    Start by grating some fresh zucchini. Then begin by combining ingredients. First, premix the dry ingredients (flour, salt, spices, baking soda and sugar) together. 

    Then, in a separate bowl, combine the wet (oil, eggs, water, zucchini and lemon juice). 

    Add the wet ingredients to the dry and mix (can do by hand) until well combined and moistened throughout. Then, fold in the nuts, if you are using them (I used pecans because that's what I had on hand -- yum). 


    Bake in 2-9x5x3" loaf pans (otherwise known as "standard loaf pans" -- the 8x4" loaf pans are 1 lb pans) for about 60 minutes, until a tester comes out clean.


    A note about the sugar: I've made this bread using a variety of sugar amounts, from 1 cup to 3 cups. It depends on what taste you are going for. 1 cup of sugar is hardly sweet at all, and would pair well with a glaze or icing. 2 cups is moderately sweet, and 3 (what the original recipe called for) is very sweet, like a zucchini pound cake. I personally like 2 cups the best, half brown and half white, but that is my tastebuds. My husband prefers the 1 cup version. Don't be afraid to experiment.

    I like this recipe for several reasons: 1) It's tasty; 2) It's easy; 3) it keeps well; 4) It yields 2 loaves, which means it is plenty to feed a crowd; 5) It's different, I've found that people still are surprised when you tell them that you've baked zucchini into a sweet bread. It is also a fantastic way to use up excess zucchini, especially if you have a lot of it (it is always plentiful in the summer, especially if you have a garden or participate in a farm share). I'm fairly certain you could bake the same exact bread with the yellow variety of summer squash, as its texture and taste are roughly equivalent, but I've never personally tried it.

    Having said that, I do have to be honest and say that I'm not sure if I would go out of my way to make this bread if I didn't have excess zucchini on hand…but this bread also makes a great base for other types of quickbread (I added apples instead of zucchinis in a previous post, and it was a yummy autumn treat). So if you have excess zucchini, or if you just want to try your hand at zucchini bread, this is a great recipe. And if you want to use it as a base for another type of quickbread, have fun experimenting and be sure to tell me how it turns out!

    Zucchini Bread
    Ingredients
    • 3 1/4 cups all-purpose flour
    • 1 1/2 teaspoons salt
    • 1 teaspoon ground nutmeg
    • 2 teaspoons baking soda
    • 1 teaspoon ground cinnamon
    • 1 cup brown sugar
    • 1 cup white sugar
    • 1 cup vegetable oil
    • 4 eggs, beaten
    • 1/3 cup water
    • 2 cups grated zucchini
    • 1 teaspoon lemon juice
    • 1 cup chopped walnuts or pecans

    Directions
    1. Preheat oven to 350 degrees F. 
    2. In a large bowl, combine flour, salt, nutmeg, baking soda, cinnamon and sugar.
    3. In a separate bowl, combine oil, eggs, water, zucchini and lemon juice. 
    4. Mix wet ingredients into dry, add nuts and fold in. 
    5. Bake in 2 standard loaf pans (9x5x3"), sprayed with nonstick spray, for 1 hour, or until a tester comes out clean.
      1. Alternately, bake in 5 mini loaf pans for about 45 minutes.


    Monday 20 August 2012

    Banana Bread


    I have always been on the lookout for a definitive banana bread recipe, and I've finally found it in the form of my friend Lauren's MIL's recipe (which I have since learned is the banana bread recipe from the 1970 Betty Crocker's Cookbook (the red one with the wheel of food on the cover). It's not what I normally think of when I think of banana bread -- that is to say a slightly spicy bread filled with nuts. In contrast, it is pale, white, devoid of spice (although you can certainly add spice in), and also devoid of mix-ins (which again, you can always add back in). It also has, to my thinking, a lot of baking powder in it, and I was expecting there to be an aftertaste. But I tried the recipe because I trust my friend Lauren's opinion since she too is an avid baker. And to my great surprise, I preferred this recipe of plain banana bread to any other that I've tried yet, and I think you will too. It is fluffy and pure, with a banana taste that hits you right in the face.

    I've made this bread plain, with chocolate chips, and with cinnamon and pecans, and that is the order of my preference -- plain, chocolate chip, and then nuts/spice. I'd highly recommend making it plain the first time you try it, and then you can always change it up later if your tastebuds want something extra.


    But first, because I've missed writing them, a brief banana interlude. Skip down to ignore my rambling and get right to the recipe!

    Bananas are native to Southeast Asia, and have been cultivated for at least the last 5000 years, if not longer! They didn't start becoming popular in the United States until after the Civil War, and it wasn't until 1933 that the first recipe for banana bread appeared in an American cookbook (Balanced Recipes by Pillsbury). Coincidentally, the appearance of this first banana quickbread recipe coincides with a marked rise in the use of the chemical leavening agents baking powder and baking soda in America in the 1930's (get it -- "rise"? I crack myself up).

    Little known fact: bananas are actually slightly radioactive due to their high potassium content. They contain small amounts of the isotope potassium-40, which has a half-life of 1.25 billion years! One banana does not have an appreciable amount of radiation, a trace amount when eaten that has been termed the Banana Equivalent Dose, or BED. But, a whole truckload of bananas actually has enough radiation to trigger false alarms by the Radiation Portal Monitors (RPMs) that screen goods coming into US land and sea ports (http://www.nti.org/analysis/articles/radiological-nuclear-detection-devices/)!

    Today, virtually all sweet bananas sold (as opposed to plantains) are of the Cavendish variety, but currently that variety is under threat of being damaged by a brand-new strain (Tropical Race 4; TR4) of a soil fungal infection called Panama Disease. A different strain of Panama Disease, Race 1, all but destroyed the previous large-scale banana cultivar, Gros Michel, in the 1950's. Blights on banana crops have such stunningly devastating effects because cultivated bananas are in fact sterile -- they produce no seeds. They are not crossed and bred like other crops to maintain genetic diversity, with the result that all Cavendish bananas are essentially clones with identical genetic material -- which means they are all equally susceptible to TR4.  It is estimated that in anywhere from 5-20 years, TR4 will reach South America and permanently cripple the Cavendish banana supply. Worse, unlike the situation in the 50's where Cavendish stepped up after the demise of Gros Michel, there is currently no viable Cavendish replacement for large-scale banana cultivation. Other variants that exist are so far away from what you and I would consider the "typical banana" that most people would consider these alternate variants to not even be bananas!

    Back to the baking!

    I apologize for the pictures, when I gathered up the photos I had in hand, I realized that some of them are from the time I tried the recipe plain, some are from when I added chocolate chips, while others are from the time I tried adding nuts. So the pics are sort of all over the place, if you are wondering why one pic might have chips while the next pic is of plain bread…

    This recipe is so easy, I almost can't stand it. First, mash up the bananas, the riper they are, the better (a fork works great for this).

    Then, combine the bananas with all the other ingredients, and mix until moistened (about 30 seconds in a stand mixer).

    Pour into a 9x5" loaf pan (I used the Pam baking spray with flour in it to coat the pan first, or you can do the traditional grease and flour), and bake at 350F for 55-65 minutes until the top of the bread is golden, and a tester is clean.


    I can't say enough good things about this bread. It is simple, easy, and tastes fantastic even without anything in it -- in fact I prefer it plain, which is unusual for me! But you can easily use this recipe as a base and customize it with nuts and spices, or chocolate chips; I've tried both of those variations as well and they are both yummy!


    Banana Bread
     Ingredients 
    • 2 1/4 cups flour
    • 1 cup sugar
    • 3 1/2 teaspoons baking powder
    • 1 teaspoon salt
    • 3 Tablespoons vegetable or canola oil
    • 3/4 cup milk
    • 1 cup mashed very ripe banana (2-3 bananas)
    • 1 egg
    • optional mix-ins: 1C of nuts or chocolate chips
    • optional spice: 1 tsp cinnamon


    Directions
    1.  Preheat the oven to 350 degrees.
    2. Grease and flour your loaf pan.
    3. Beat the mixture for 30 seconds on medium speed (the great part of the recipe is that you don't have to cream anything or do any step-wise additions; just dump all the ingredients into the bowl and mix).
    4. Pour into a 9-5" loaf pan.
    5. Bake 55-65 minutes until tester comes out clean

    Friday 17 August 2012

    Blueberry Crumb Bars


    When I was little, my Yia-Yia's backyard was completely lined with blueberry bushes, and one of my favorite childhood memories is going out into her backyard with her to pick berries, so blueberries have been one of my favorites my whole life.

    Although I love blueberry pie, I really wanted to try something different with the berries this time, and I found a great recipe for blueberry bars on Smitten Kitchen's fabulous site. If you've never visited her site, please do, it puts mine to shame. I only wish I was as creative of a baker, and as talented of a photographer.
    But anyway, these bars attracted me because they seemed simple and straightforward, and yet big on taste. I have very little spare time, so I try to get the biggest baking bang for my buck, so to speak, and this recipe looked like it fit the bill.


    Like all the best summer recipes, you start with fresh fruit: blueberries, which you combine with a little lemon juice, sugar and cornstarch.

    Then you assemble the dough for the crust by combining sugar, flour, baking powder, salt and lemon zest.

    Cut in the butter and egg (I used a pastry blender, but a fork works just as well, or a food processor would also work nicely -- I just never want to clean mine afterwards).

    The dough will be moist but crumbly when you are done. Pat half the dough down in a 9x13" pan…

    Dump the blueberry mixture on top…

    And then crumble the remaining dough on top. Easy! I told you!

    Bake at 375F until the top turns golden. The original recipe said it should take 45 minutes, in my oven it took closer to 55, so the easiest thing to do is just start watching around 45 minutes, and pull it out of the oven when the top crumbs have a nice golden hue.

    Let them cool to room temperature, and then cover and put them in the fridge to chill. As Smitten Kitchen also notes, these bars cut best when chilled. And although you don't necessarily need to store them in the refrigerator after cutting (they won't spoil or anything), they do keep better and taste better in the fridge than at room temp.

    And these bars are definitely worth it! They are easy and delicious, a perfect no-fuss summer treat!

    Blueberry Crumb Bars

    Ingredients

    Dough
    • 1 cup white sugar
    • 1 teaspoon baking powder
    • 3 cups all-purpose flour
    • 1 cup cold unsalted butter (2 sticks or 8 ounces)
    • 1 egg
    • 1/4 teaspoon salt
    • Zest of one lemon


    Fruit
    • Juice of one lemon
    • 4 cups fresh blueberries
    • 1/2 cup white sugar
    • 4 teaspoons cornstarch


    Directions
    1. Preheat the oven to 375 degrees F (190 degrees C). Grease a 9×13 inch pan.
    2. In a medium bowl, stir together 1 cup sugar, 3 cups flour, and baking powder. Mix in salt and lemon zest. Use a fork or pastry cutter to blend in the butter and egg. Dough will be crumbly. Pat half of dough into the prepared pan.
    3. In another bowl, stir together the sugar, cornstarch and lemon juice. Gently mix in the blueberries. Sprinkle the blueberry mixture evenly over the crust. Crumble remaining dough over the berry layer.
    4. Bake in preheated oven for 45-60 minutes, or until top is slightly brown. Cool completely before cutting into squares.

    Thursday 16 August 2012

    Strawberry Rhubarb Oat Bars


    I've had an unintentionally long hiatus from posting recipes. That is a combination of moving, working two jobs, and being pregnant. The frustrating this is  it's not so much finding the time to cook or bake (although I'm not doing either as often as I would like) as it is finding the time to organize and post a well thought-out entry. But I finally sat down today to write the first of about 30 some-odd entries that I have had back-logged and in the posting queue since last summer, so I'm posting these out of chronological order, but according to the season we are currently in, if that makes sense. I have about 6 baking entries that I consider "summer themed' so I am going to try to bang out as many of those posts as I can before the end of August.

    I also have a huge number of backlogged cooking posts from the farm share I had last summer, which I suppose are "summer themed" as well, but I'd rather get the baking ones out of the way first, since I tend to be more enthusiastic about my baking than about my cooking.

    Strawberry and rhubarb is one of my favorite summer flavor combinations, and this is not the first strawberry-rhubarb dessert I've posted on this blog, but it might just be my favorite. This particular recipe is a relatively simple bar recipe which I modified from a post on landolakes.com (don't ask how I ended up there browsing, I can't remember for the life of me!)

    You start with the filling, which is made up primarily of sliced rhubarb and sliced strawberries.


    Cook the fruit over medium heat with a little lemon juice until the fruit breaks down into a preserve of jam consistency. 

    The original recipe said this would take about 8-12 minutes, but if I recall correctly, it took me about 20.

    Then you add in sugar and cornstarch and bring it back up to a bubble, give it a chance to thicken, and set it aside.

    While the fruit is cooling, start on the crust by combining oats, butter, brown sugar and flour in a bowl.

    Pat about half of it into the bottom of a 9x13" pan.

    Spread the fruit over the bottom crust (fruit does not have to cool completely, however long it takes you to make the crust and preheat the oven is good enough), and then sprinkle the reserve crust on the top evenly.

    Bake at 350F for 30-35 minutes, until the top is a nice golden brown.

    Cool completely before cutting and serving.

    These bars were delicious, and a big hit when I brought them into work. They are sweet, tart, transport well, and don't have to be refrigerated. 

    All in all, they are a great choice for a summertime treat, especially if you need a take-along dessert!!


    Strawberry Rhubarb Oat Bars

    Ingredients

    Filling
    • 1 1/2 cups fresh or frozen unsweetened rhubarb, cut into 1-inch pieces
    • 2 1/2 cups sliced fresh strawberries
    • 1 tablespoon lemon juice
    • 1/2 cup sugar
    • 2 tablespoons cornstarch


    Crust
    • 1 1/2 cups all-purpose flour
    • 1 1/2 cups uncooked quick-cooking oats
    • 1 cup firmly packed brown sugar
    • 3/4 cup butter softened
    • 1/2 teaspoon baking soda
    • 1/4 teaspoon salt


     Directions
    1. Combine rhubarb, strawberries and lemon juice in 2-quart saucepan. Cover; cook over medium heat, stirring occasionally, until fruit is tender (8 to 12 minutes). Basically the consistency of preserves, if not full-on jam.
    2.  Combine 1/2 cup sugar and cornstarch in small bowl. Stir into fruit mixture. Continue cooking, stirring constantly, until mixture comes to a boil (about 1 minute). Continue boiling until thickened (1 minute). Remove from heat. Set aside. 
    3.  Heat oven to 350°F. Combine all crust ingredients in large bowl. Beat at low speed, scraping bowl often, until mixture resembles coarse crumbs. Reserve 1 1/2 cups crumb mixture. Press remaining crumb mixture onto bottom of greased 13x9-inch baking pan. Spread filling over crust. Sprinkle with reserved crumb mixture.
    4.  Bake for 30 to 35 minutes or until golden brown. Cool completely.